
In chess, a checkmating pattern (also called a mating pattern) is a recurring checkmate position that appears again and again in practical games.
In this article, we will discuss 5 essential checkmate patterns that every player should know. These patterns are common and can help you finish games quickly once you recognize them.
Read: How to Make a Plan in Chess (A Step by Step Guide)
Why Do Mating Patterns Occur?
Mating patterns do not appear randomly. They are usually the result of three things:
- Piece coordination
- Weakness in the opponent’s position
- Your positional advantage
Piece Coordination
Piece coordination means your pieces work together in a specific way to deliver checkmate. This is the most visible part of any mating pattern.
For example:
- A knight can control escape squares of the opponent’s king
- A rook or queen can deliver checkmate on an open file or rank
Without coordination, the pattern cannot exist.
Coordination is what allows you to exploit weaknesses in the opponent’s position.
Weakness in Opponent’s Position
Mating patterns become possible because of weaknesses.
For example:
- A king trapped behind its own pawns
- Lack of escape squares
- An exposed king
These weaknesses are sometimes small, but they are enough to allow a checkmate pattern to appear.
Positional Advantage
Most mating patterns occur because you already have a positional advantage.
For example:
- A rook on an open file
- A bishop controlling a long diagonal
- A knight on a strong outpost
These advantages allow your pieces to coordinate effectively and attack the opponent’s weak position.
Mating patterns are the result of good coordination, combined with weaknesses in the opponent’s position, often created by positional advantages.
(1) Back Rank Mate
A Back Rank Mate is one of the most common checkmates in chess. The king is trapped on the last rank (1st rank for White, 8th rank for Black), and a rook or queen delivers checkmate.
Example 1:
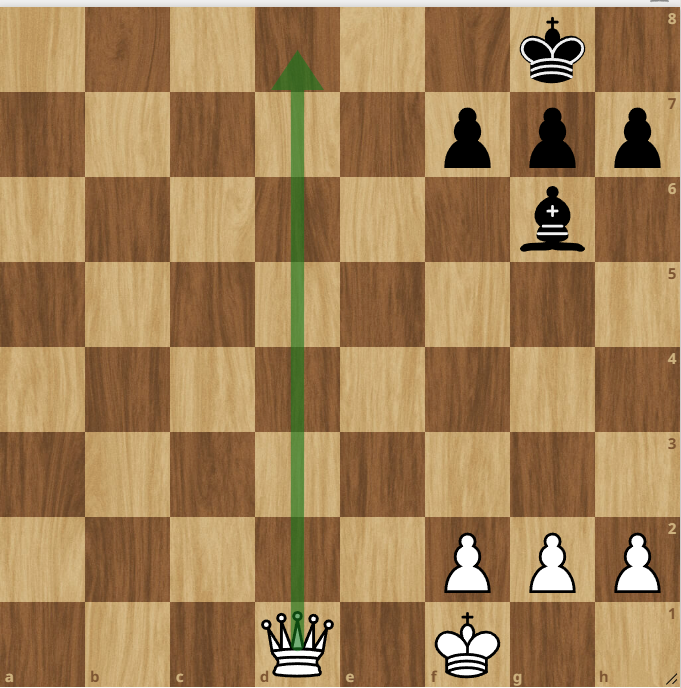
White plays Qd8#, and it’s checkmate.
In this position:
- The black king is trapped behind its own pawns
- No escape squares are available
- The bishop cannot defend against Qd8#
This is called a pure (or classic) back rank mate.
Example 2: Not a Pure Back Rank Mate
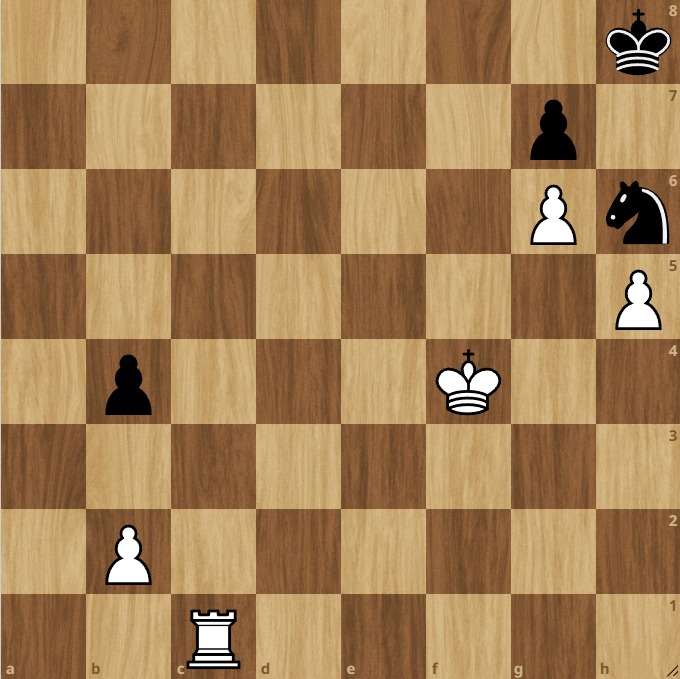
White has trapped the king on h8 with a pawn on g6.
It is Black to move, but no matter what Black plays, Rc8# is checkmate.
Here:
- The king is not trapped only by its own pawns
- The g6 pawn helps restrict escape
This is still a back rank mate, but not a “pure” one.
Key Insight
There are many variations of back rank mate:
- The trapping pieces may differ
- The exact weakness may differ
But the core idea remains the same:
Trap the king on the last rank and deliver checkmate with a rook or queen.
There is a similar mate patterns, that traps the opponent’s King more than back rank mate. In the next section, you will learn about “Smothered Mate”.
(2) Smothered Mate
(2) Smothered Mate
A Smothered Mate is a common and instructive checkmate pattern that appears at all levels of chess.
In this pattern, the king is completely trapped by its own pieces, and a knight delivers the checkmate. Compared to a back rank mate, the king is even more restricted—there are no escape squares at all.
Core Idea
Trap the opponent’s king with its own pieces and deliver checkmate using a knight.
Main Features of Smothered Mate
The smothered mate has following features:
- The king is surrounded by its own pieces
- A knight delivers the final checkmate
- Often involves a queen sacrifice
- The pattern usually occurs near h7 / h2 squares
- Limited or no escape squares for the king
How Smothered Mate Works?
The exact sequence can vary, but the typical idea is:
- The opponent’s king becomes restricted (usually near the corner)
- You force the king into a tight position using checks
- Often, a queen sacrifice is used to remove the last escape square
- A knight delivers the final checkmate
Example 3: Smothered Mate from White to Black
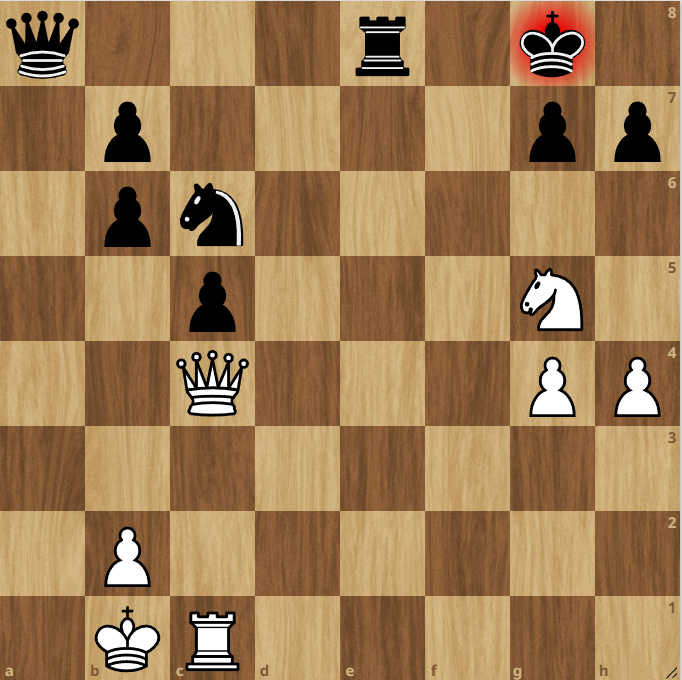
In this position, the black king is on g8 and is already under pressure. The f7 pawn is missing, which creates a weak square near the king.
White starts with a forcing idea.
The white queen gives a check, pushing the king toward the corner. If the king tries to escape to f8, then Qf7# is immediate checkmate. Therefore, the king is forced to go to h8.
Now comes the key idea.
The white knight on g5 jumps to f7+, giving check. The king has only one square and returns to g8.
Next, White plays Nh6++.
This is a double check:
- The knight is giving check
- The queen is also giving check
Because it is a double check, the king cannot block or capture—he must move. The only available square is h8.
Now the position is ready for the final idea.
White plays the queen sacrifice: Qg8+.
- The king cannot capture the queen because it is protected by the knight on h6
- Therefore, the rook is forced to capture the queen
After Rxg8, the black king is completely trapped by its own pieces.
Finally, White plays:
Nf7#
This is checkmate.
Read: How to Calculate in Chess – A Simple Thinking Process
Example 4: Smothered Mate – Queen Sacrifice on Edge, not Rank
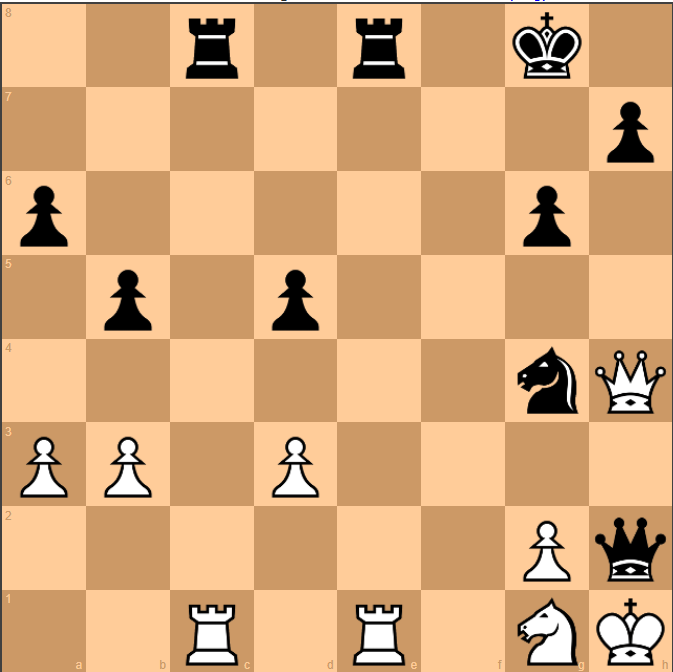
The above, position taken from game between Ronald Augustus Slade vs David Vincent Hooper, WCEU, Bristol England, 1947.
In the position, Black sacrified Queen on h2 instead of typical g1 and executed Smothered Mate.
Game Continuation:
1.   ...Qxh2+
2. Qxh2 Nf2#
There is another variant when King is not castled.
Example 5: Smothered Mate – When King is not Castled
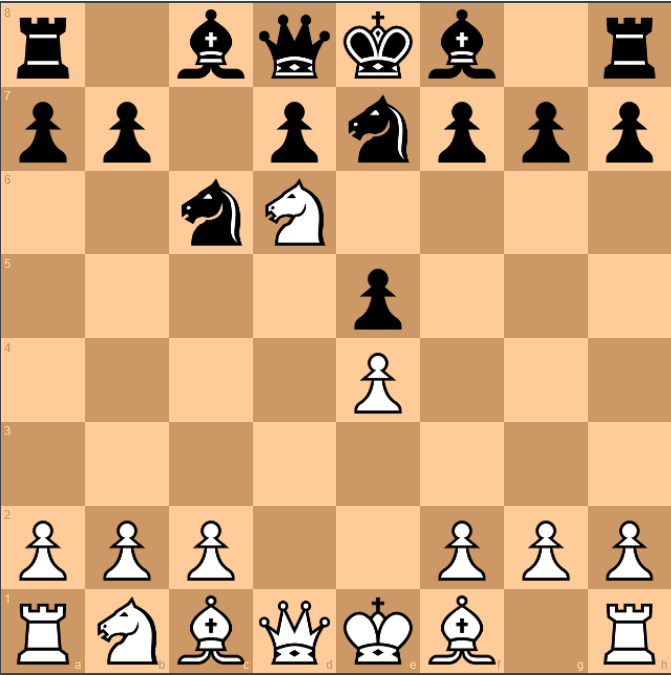
This position is taken from game between James McGrouther vs Robert McCann, Scottish Minor Tournament, 1893.
Black last move was Ne7 and it trapped its own King followed by a check from White, Nd6#. This is another type of Smothered Mate.
Key Insight
Smothered mate happens because of three main factors:
- The king is trapped by its own pieces
- The attacker uses forcing moves (often sacrifices)
- A knight delivers the final checkmate
The essence of smothered mate is not the sequence, but the position:
a trapped king with no escape squares and a knight delivering mate.
The smothered mate is Queen + Knight mate, there are mating patterns involving a Rook and a Knight. You learn this in next section.
(3) Anastasia’s Mate
Anastasia’s mate is a classic checkmate that uses a rook and a knight to trap the opponent’s king on the edge of the board. It uses one of the opponent’s own pieces to block the escaping square for the king.
Main Features
- The knight is typically placed on e2 or e7.
- A rook delivers checkmate from the h-file.
- Sometimes a queen can deliver the final checkmate.
Core Idea
Trap the king on the edge of the board and deliver checkmate.
Example 6: Anastasia’s Mate
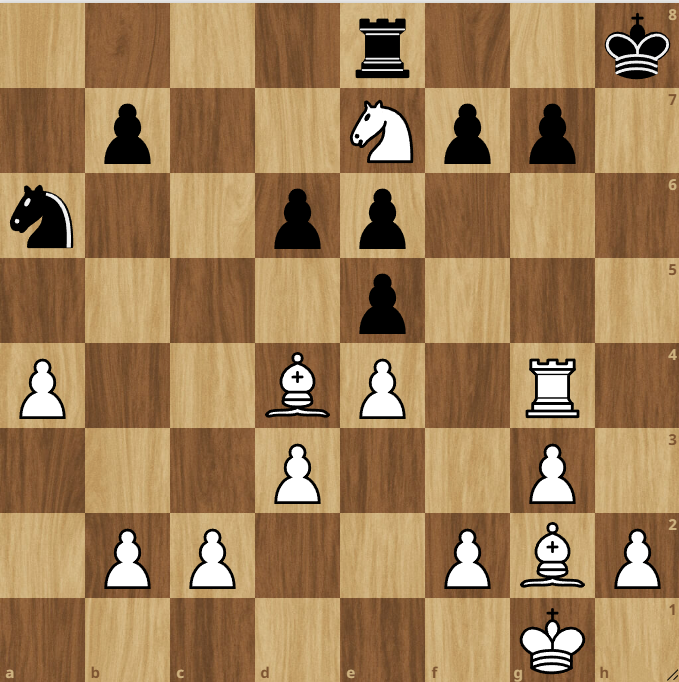
In the position above, it is White to play. The knight on e7 is under threat, but it blocks the escaping squares for the black king. The rook check on h4 is unavoidable. White plays Rh4#. This is Anastasia’s mate.
There are other variants of Anastasia’s mate. We shall see examples of those in the next section.
Example 7: Vertical Anastasia’s Mate
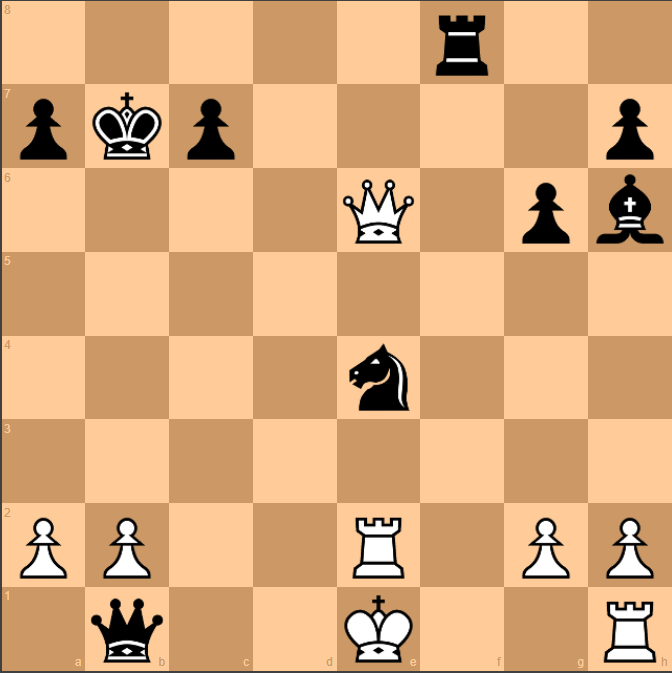
Anastasia’s mate can happen on all edges of the board. The knight on e2 or e7 is not a fixed rule. Often, the blocking piece is a piece rather than a pawn, which blocks the escape route of the opponent’s king.
In the position above, Anastasia’s mate is delivered vertically, which resembles a back rank mate.
The white king is blocked by its own piece, the rook. The escape squares d2 and f2 are controlled by Black’s knight on e4. This is a vertical Anastasia’s mate.
Key Insight
Anastasia’s mate is a good example of piece coordination and the weakness of the opponent’s king being exploited in the best possible way.
- The knight must block the escaping squares and trap the king on the edge of the board.
- A queen or rook delivers the checkmate.
- The king’s position is such that it is blocked by its own piece in the middle.
(4) Arabian Mate
Arabian mate is a classic checkmate pattern that uses a Rook and a Knight to trap opponent’s King in the corner of the board. It is one of the oldest mating pattern shows clear coordination between pieces.
In this pattern, the Rook and the Knight, work in simple yet powerful way. The Rook trap the King in a edge of the board. It can trap along a rank or a file. The knight controls the key squares around the king. Then deliver a checkmate.
Core Idea
Trap the King in the corner and use the Rook and the Knight to deliver checkmate.
Main Features
The main features of Arabian mate are:
- The king is trapped in the corner (h8, h1, a8, or a1)
- A rook gives check from the side (rank or file)
- A knight controls the escape squares near the king. If king on h8, the knight controls h7, g8.
- The king cannot capture the rook because it is protected by the knight
How Arabian mate works?
The idea is simple, but very instructive.
First the King is pushed to the corner because of pressure or limited space to move. Then the rook traps the King in the rank or file. The Knight is placed in such a way that it controls the squares that King could use to escape.
Now the opponent King has no squares.
Finally the Rook delivers the checkmate.
Example 8:
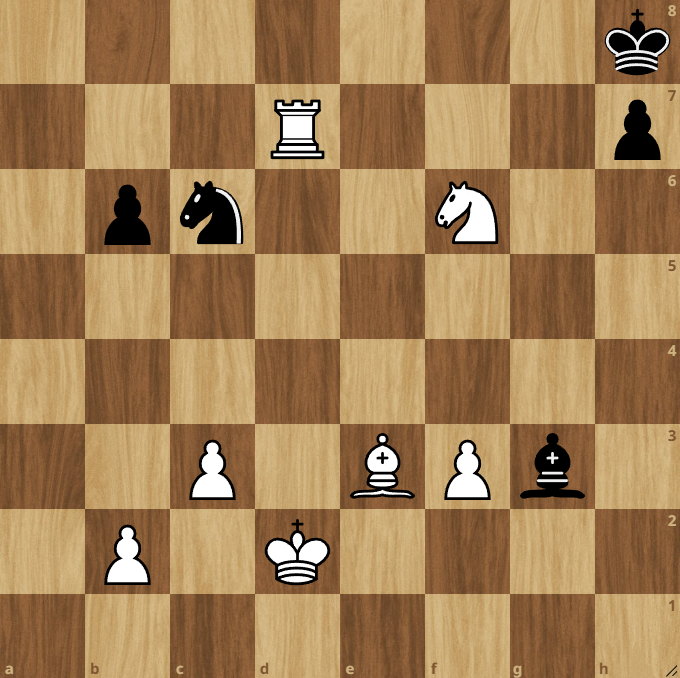
In the position above, its White turn to play. The Black King is trapped in the last rank. Not only that, the Knight on f6 is controlling the escape square g8. White will play Rh7# and the game is over. This is Arabian Mate.
Example 9: Arabian Mate in Real Game
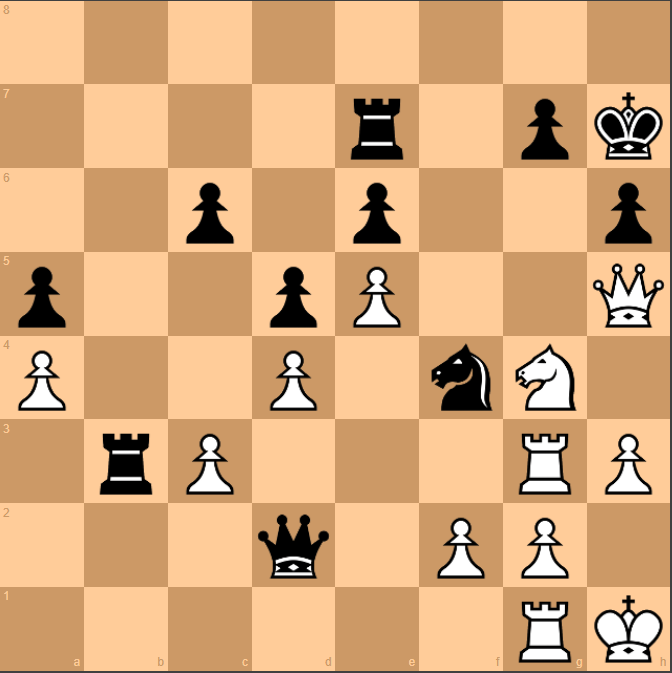
In this game, White won using Arabian mate. In order to achieve the mating system, He sacrificed his queen.
Game Continuation
1. Qxh6+ gxh6
2. Nf6+ Kh8
3. Rg8#
This is another way to checkmate using Arabian Mate pattern.
Not only Rook and Knight, other pieces like Bishop have mating patterns too. In the next section, you will learn mating pattern using Bishops.
(5) Boden’s Mate
The Boden’s mate demonstrates the true power of a pair of Bishops. The two Bishops mate the opponent King in crossing diagonals. The King has no escape squares.
It is rare, but an instructive mate pattern.
Features of Boden’s Mate
The main setup of Boden’s mate is:
- Diagonals are open
- Opponent King is stuck in the center or corner.
- Bishops control the intersecting diagonals. The King has no escaping squares.
Bishops are long range pieces, they become deadly in open positions. This is the reason Boden’s mate is possible.
Example 10: Boden’s Mate
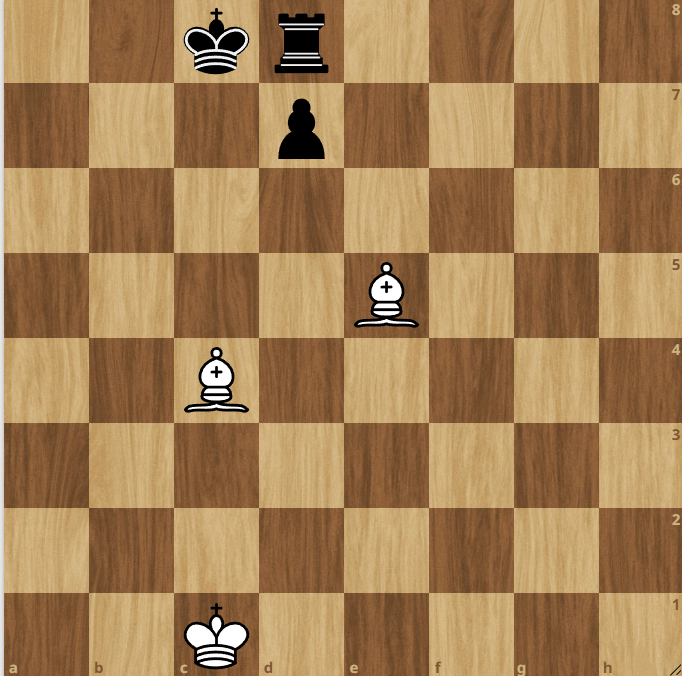
Its White to play. White has already, covered the h2-b8 diagonal. The Rook and the pawn are blocking own King. If White Bishop check from a6, then game is over. This is Boden’s mate.
This mating pattern does not use any other pieces except Bishops to deliver a checkmate.
Let us see an example from real game.
Example 11: Boden’s Mate in Laskar Game
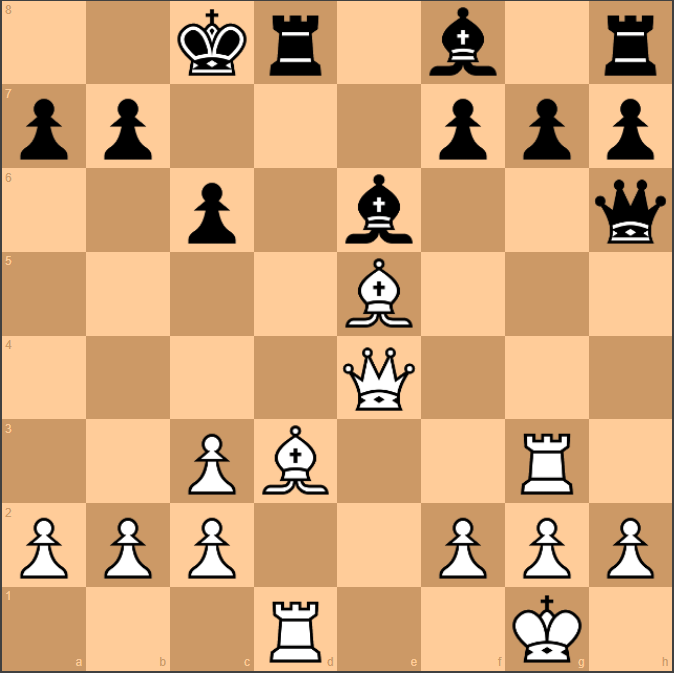
In the game above, Lasker sacrificed his Queen to get the Boden’s mate position. The game continued like this;
Game Continuation:
1. Qxc6+ bxc6
2. Ba6#
The sacrifice Qxc6+ is forcing because the Black King cannot escape. The Bishop on e5 is covering the escape squares. Therefore, bxc6 is the only move to avoid the check.
Summary
| Pattern | Pieces Used | King Position | Idea |
| Back Rank Mate | Rook or Queen | Trapped on last rank | King blocked by own pawns or pieces and mate on last rank. |
| Smothered Mate | Knight or Knight + Queen | Trapped in corner or surrounded by pieces. | King is surrounded by own pieces and knight mates. |
| Anastsia’s Mate | Rook + Knight | Edge of the board | Knight blocks the escape square and Rook deliver mate. |
| Arabian Mate | Rook + Knight | Corner of the board | Rook cut off King, and Knight guard the escape square. |
| Boden’s Mate | Bishop Pair | King in the Center or Corner | Bishops cover diagonals to mate |